Nuances of Spinning a Frisbee on Your Finger Nail


In this video I talk about the basics of a flat nail delay and a rim delay.

In Freestyle Frisbee, a Delay is when the Frisbee is kept spinning on one’s finger nail. This can be done either in the center of the Frisbee on in the rim of the Frisbee.

Most people want to learn the Center Delay immediately. However, it can take many hours of practice to get it down.

The way I learned was by starting with the Rim Delay. This kept me from getting frustrated by not mastering the Center Delay right away. I learned to pass the disc under my legs and behind my back, all with a rim delay.

Over time, I began to understand how the disc progressed naturally in a circle and how to control it better. And then, one day I could keep it in the center.

So, don’t overlook the rim delay as you’re learning new tricks.

Go against the spin

I am not certain who was the first person to get against but I feel pretty
confident in stating that if there was a record for such things I would be
the career leader. The basic principle of spin is “Natural Procession”. What
that means is when a disc is spinning it wants to go a certain way. As a
person nail delays a disc, they do so by making small circles in the
direction of the disc. If you let your hand go limp the disc will rotate
around your finger the way it is spinning. There is also an anatomical
effect in play. If you are left handed, it is easier to learn to nail delay
clock spin. To test this theory, make small circles in the same direction
with both hands. Which one is easier for the respective spins? Now, to get
against, you must learn to go the opposite way of the spin. The best way to
start to learn this is to practice the “Crank”. There are 8 cranks, 4 with the spin and 4 against. Clock
inside, clock outside, counter inside and counter outside. All delay moves
are a part of a crank, some more than others. Here’s a drill. With clock on the left hand
(opposite hand for counter) take a nail delay and hold it above your head
with a straight arm. Now let the disc down and rotate your elbow to the
outside until the disc goes all the way down under the arm and let it pass
under your armpit until it comes out in front of you. That is a clock
outside crank. Now take a nail delay (clock again) in the right hand. Pass
it under the armpit and lift it up until it is above your head. That is the
second basic crank. It is important to try to keep the disc in the middle
and to try to do it slowly. By doing that, you are gaining a “feel” for the
spin of the disc and it will open up many more moves for you over time.

Now for some keys on how to do it. Try to get the disc to do all of the
work. If you are doing the left hand crank, let the disc tilt slightly
towards you. Then let the disc begin to drop down. It will be much easier
that way. Also, don’t keep your feet still. Rotate around the disc.

Here’s some moves to try:

Cove: This is a left hand (clock) pull done behind the back. Again, try to
tilt the disc so that it is falling in the direction you want to take it.
For extra credit try getting it in the ditch (or rim) and once you get it
through, continue the move into a one-hand turnover.

Juice: This is under the left leg with the left hand. Tilt the disc towards
you, drop it and pull it through. Viola! Magnifique!

BTB Crank: Do the drill I mentioned above and at the end of it, instead of
pulling it through, take it behind your back. Remember to rotate into the
behind that back position as the disc comes around your back.

SKIDS:
Skids are against the spin moves done in the ditch (or inside rim). The
easiest way to do them is with a tilted disc.

Here’s basic Skid:
Throw up some spin with your right hand and extend your left into an
inverted wrist delay. Instead of keeping the disc on the finger, as soon as
you gain control, pull the disc around your back. Again, it helps to rotate.
Keep practicing this. You’ll start to gain a remarkable amount of control
and can use it as a set to other moves.

Skidout:
This is with the right hand (clock). Toss up some spin with and angle onto
your right hand. Freeze it, toss it up slightly then get it behind your
back. As soon as it touches your right hand finger nails drop your shoulder
and rotate around. Booyah!!

Amphibian: This is an inside crank done under the right leg (clock, right
hand). Drop your shoulders into position to get a better angle. Once you get
it down low pop it out.

WINDPLAY: If you are in a benign environment, you should be able to quickly
master some of these moves. Now to take it a step further, take it outside
and engage in some wind play. Think about where the disc is once it comes
out of one of these moves. Take the basic skid (left hand clock btb). If you
are facing the wind and do this move, it will now be behind you and you are
chasing it down wind. Now turn 1/3 towards your left. Now when you do the
move, it comes out into the wind lending itself to a nice floaty pull. Do
another skid like juice and you’ve just done skid row! Call your mom and tell her
“I’m on Skid Row Momma”!!! Actually it’s really Brain Hotel but she won’t
know the difference.

Skippy Jammer

Paul says, “turn it over”

The turnover is probably as technical a move as possible in disc
manipulation. It entails both spins, a myriad of angles and potentially the
whole surface of the disc. To do a turnover requires the ability to delay
both spins, to push the disc flat from an angled orientation and an
understanding of the wind’s (which can be self created) influence on the
disc. A basic clock turnover (a “the” turnover if there is such a thing) to
upside down counter would start with a clock delay in the left hand. One
must precess the disc. The nail will go from the center of the disc towards
the rim until the dome side is angled to a point where the disc can be
pushed with such force so the dome side is pushed into the wind and turned
over to a degree (and somewhat flattened). The finger would be inside by
the rim close to the body with the bulk of the disc away from the body (hand
on inside portion). This requires you to find the position which gets the
dome to be in a position to be pushed into the wind. This push is
essentially a skid as you push against the prevailing spin while pushing
into the wind while elevating it somewhat. To complete the turnover the
right hand needs to pick up the (now upside down) disc (somewhat, not
completely as it is at an angle) and flatten it. This is where right hand
needs to push into the dome upwards, making contact near the lowest point on
the disc, on the other side from the body. This push up will force air into
the “cup” of the disc, equalizing the pressure in it and flattening it. As
this is happening, the finger should precess back towards the center of the
upside down disc. It is kind of like digging out the disc.

The underlying key to a turnover will be the push. This is a
muscle-memory/feel thing and is different for everyone. The stronger the
push, the flatter the disc can become but the higher the risk of a
“blowout”. The push has a few components. The less the push the more the
upside down take will be angled becomes more difficult as the incoming angle
is increased towards near vertical. When pushing the disc over you will
push forward towards the wind (or somewhat across the wind) as well as
manipulating it in an upwards direction.

The ability to find the right body positioning cannot be understated.
However done, it results in the dome of the disc pushing into the wind like
an Apollo spacecraft re-entering the atmosphere and a “pull” which is also a
push to flatten the incoming turned-over disc. All funky turnovers will
have the same pressure point relationships. They will manifest themselves
in many ways, but if you could just focus on the disc contact point, they
will be remarkably similar.

Paul Kenny

Paul Kenny expounds on the Center Delay

Beyond throwing and catching, which are the most fundamental
tools required, initial tooling in my mind has a couple paths.
The outer rim and the center. With the center, you will want
to learn to spin the disc keeping your finger, specifically the
nail, under the center of the disc and in contact with it as
best as you can. This is called a delay. With the outer rim
you want to learn to keep the disc in the air as best you can.
This might include brushing, rolling or kicking and can involve
alot of running around. I will leave the outer rim skills to
one more proficient than I.

When I first learned to delay a disc, I had trouble. I already
knew how to spin a basketball, but had trouble figuring out how
to spin a disc. A spinning basketball, because it has so much
weight away from the center, has a stable center. When you spin
it correctly, the finger “locks” in the center. In fact, I could
spin a basketball on a pencil and hand it to just about anyone
and they could hold it spinning. With a spinning disc, the center
is not stable and the finger wants to drift off center on it’s
own. It takes very small, very quick corrections to maintain
center. It can take some time and repetition to get there.
Further complicating the development of this feel is the gyroscopic
effect intrinsic to spinning objects. When you touch a spinning
disc off center, the disc will “precess”, or turn 90 degrees
from where you touched it. Thus the small corrections discussed
above need to be in the direction of the spin. It will seem
you are always trying to catch up to the correction which wants
to stay 90 degrees ahead of your finger! This results in the
finger seeming to be doing really small circles near the center
of the disc. As you get more proficient, these “circles” and
the corrections get so small that it appears the finger is staying
still in the center of the disc!

Higher level functions such as skids and turnovers will use this
precessive property of discs in a complicated way to achieve
the moves. Skids, or “against the spin” moves work against the
prevailing precession while turnovers are done with the spin
in one direction until the turnover and then with the spin in
the other direction. What complicates it is the need to work
at non-flat angles and switching your brain from one spin’s thinking
to the other.

Paul Kenny

Going from a Rim Delay to a Center Delay

For most learning to go from a high Z rim delay to a center delay marks a whole new level of understanding in disc control. It means being able to bring most any angle throw back to the center, increased center control, and leads to understanding angle changes and off center tips. For me this skill took some practice.

To accomplish this task it helps to be able to throw a high Z steep angle to your self. To learn clock right hand throw a right handed backhand throw with tons of spin. It should come off on a steep angle, nearly perpendicular to the ground such that the bottom is pointing more downward than the top and the nose is pointing to the right. It should also be perpendicular to your chest plane. Now that the disc is in the air use your right hand and take it on a rim delay. Your palm will be facing to your left and your finger(s) should be curled under the rim. Let the disc hang in this position long enough to get it under control but not so long that it tilts around so the nose is pointing to your body. From here there are two common methods of getting to the center.

1: Give the disc an upward tug. As it lifts up hold your hand still so that the bottom of the disc rides along your finger nail(s). Once your nail is near center push hard to the left. The ideal location is it about 6 o’clock halfway between the rim and the center. As you push to the left the disc will flatten out. Once it is flat get the center delay under control.

2: Gently swing the disc forward. As the disc swings forward the rim will pull against your nail forcing the disc to level off. Once it is halfway flat move your nail to the center and gain delay control.

To learn counter left reverse the right/left directions as if looking in the mirror.

Once you become proficient at this maneuver try it on a different angle or the opposite hand. Example, once the disc is on a rim delay let it drift around on your nail until the nose is pointing upwards to the left perpendicular to your chest plane. The motions are the same. Give it a tug so it rides up your nail. Now push right at 12 o’clock between the rim and the center. It will flatten out as before. Note: you may have to duck your forearm below it to keep from knocking it off your finger.

The biggest thing to learn is that the location to press in with changes based on the direction of the nose. It’s always 90 degrees ahead of the spin from the nose. So, with clock spin, if the nose is pointing away from you (12 o’clock) push it out so the disc rides up your nail, then push towards you at 3 o’clock. With counter spin you’d push at 9 o’clock.

Once this becomes second nature try flattening the disc directly from the throw with a tip. The physics are the same. Just tip it up 90 degrees ahead of the spin from the nose. You can also try to flatten it out from a rim delay to a flat set. This set it the beginning to many moves and catches such as a scarecrow and a one and a half btb.

Jake Gauthier

Jake’s take on how to start – or – Learning to Rim delay and Brush

Most jammers will tell you that you need to learn to delay before you can jam. Unfortunatly the learning curve for the delay is very steep and often turns people off before they start to feel the rewards of jamming. Fortunaly there are two tricks that anyone can do with a small amount of practice but a huge amount of fun.

Rim delay:

This is how I learned to jam. Mike Esterbrook would thrown me zzzs and I would let it drift onto my nail. If I felt brave I’d try to keep it in the center but mostly I’d let it fall to the rim. While it spun there it I would pass it under my leg, behind my back or anywhere else I could think of. Eventually it ran out of spin or I hit myself with it and it would plop to the ground. When I got a little better I’d use my left hand to hold it at my left side and grab it behind my back with my right resulting in my first completed series!

To learn the rim delay is simple. Find someone who can throw the disc with a good amount of spin. When they throw it to you let it float onto your index finger’s nail. The trick here is to make sure only the nail contacts the disc. This is where fake nails help the most. Now that the disc is on your nail hold your hand up with your finger pointing to the sky. Let the disc circle slowly around being sure that only your nail contacts the disc. Holding your finger bent to a 45 degree angle will help but however you do it be sure to keep your nail in contact. The disc will spin round and round and eventually run out of juice and flop over. You have just completed a rim delay.

It won’t take but 5 or 10 of these and you’ll get the feel for how the disc moves and how to keep your nail instead of your finger in contact. Be sure to try both hands. Once you are ready try passing it from hand to hand. Once that is easy do it under your leg. You are now freestyling…it’s as simple as that. Add a catch in there and you’ve completed a series. Pass it on the rim to your friend and you can co-op. Really there’s nothing to it.

Air Brush:

This is my favorite of all moves. It is one of the easiest moves to execute yet honing this skill can take a lifetime. To practice brushing toss the disc in front of you almost perpendicular to the ground. If there’s alot of wind make the set a little flatter. It should go up a little ways, 2 or 3 feet and then come back down to you. When it’s in range hit (brush) it with the palm of your hand so as to add spin and send it back up 2 or 3 feet. Repeat until you lose control, pass it to a partner or catch it. That’s all there is to it. The real tricks here are 1: try to add spin when you hit it. Hitting it with the wrong spin or no spin will kill its flight (at least if you don’t know what your doing). 2: run after it. Even the best players can’t keep the disc in front of them the whole time. And who would want to, the fun is in the challenge. Chase it around and bash at it for as long as you can. You’ll find that shortly you can keep it in the air for quite a while.

Once you get the hang of brushing to yourself try and brush it to a friend. There are two ways to accomplish this. One is to toss the disc up with much less of an angle so that the nose is pointing towards the target. Then when you brush it the disc will float over as if you threw it there. This move really impresses non-freestylers. The second way is to brush it so that it arches over you your friend. This is akin to throwing a major angle up into the air and over to you friend. If your friend is cool she’ll try and brush it back and suddenly you are co-oping again. Funny how it always come back to co-oping.

Putting them together:

Now that you can brush and rim delay try putting the two together. Take a throw on a rim delay. If it’s clockwise spin take it on your left hand. Let it spin around until the nose is pointing to your partner. Then drop your left hand out and brush it with your right. (Reverse g the hands for counter spin). It should float over nicely to your partner who will catch a triple spinning gitosis…sorry I’m day dreaming again. As long as it gets to her you did your job.

Now try the same trick but to yourself. Take it on the rim delay and do a few moves. Once it slows down wait until it is pointing away from you on a steep angle. Then drop out your delay hand and brush with your other hand. Keep on brushing until you’re expression is complete, then go for a catch.

Last trick, go from a brush to a rim delay. This one is a bit tougher so I saved it for last. Remember how I said to always add spin? Well if you can do this well enough you should be able to take it on the rim again and do some more rim tricks. There aren’t many tips I can give on this one but I will say that once you get it you will feel unstoppable. It means that no matter what throw you get you can do something with it because you’ll be able to add spin when every you need it. They call this maneuver a rerev.
#beginner

Learn to Center Delay

Practice, practice, practice. 🙂

Well, beyond that, here’s what helped me in the beginning. You can do
this by yourself.

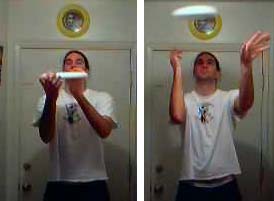
1) Develop a two handed throw to your self that is flat (parallel to the
ground) and floats down gently. Start by placing each hand on the outside
of the rim, one hand close to you, the other on the far side of the rim.
Throw your hands and arms out to the sides, popping the disc gently up in
air, about a foot or two in height above you head. Practice this skill
alone, without attempting the delay, until you get the disc to float very
horizontal and with as much spin as possible. Like a spinning top, the
more RPMs the disc starts with, the more stable and easy to control it
will be. The flatter it is, the easier it will be to balance and delay.
Once your self throws are stable, you are ready to proceed. Side note: If
your right hand is the one close to you, your spin will be
counter-clockwise. If you left hand is the one close to you, the spin
will be clockwise. One spin may be easier for you to throw and one spin
will be easier to delay at first. Make observations about your tendencies
and what works best for you.

2) Make sure the contact with the disc is with your fingernail, however
small it is (artificial nails are not necessary in the beginning). Hold
you finger, slightly bent, so that the nail itself is close to parallel
to the surface of the disc. This way the spinning disc will slide on your
nail. Apply a silicon spray lubricant to the disc to further reduce
friction between the disc and your nail. As soon as the disc contacts
flesh, there’s major friction involved, usually leading to loss of spin
and control.

3) Next, connect the above two skills. After you release the disc into
the air, reach up to the disc with your delaying hand and try to make
contact with the disc as close to the time when it is transitioning from
popping up to floating down. The disc is traveling slow at this time.
Spot the center of the disc as it’s above eye level. Keep your finger
kind of springy to absorb the contact of the disc with your finger at
this time and follow the disc’s descent with your arm to slow its further
descent. If you can keep the disc above eye level at this time, you can
continue to spot your finger on the bottom of the disc and track your
centering attempt. Eventually your eye-hand coordination will develop,
allowing you to stabilize the disc below eye level, without seeing your
finger on the bottom of the disc. A clear or translucent disc can also be
helpful at this stage.

4) Finally, make small circular motions with your arm and finger, in the
same direction that the disc is spinning. This motion will help correct
any non-horizontalness of the disc and helps you track to the center of
the disc to maintain the delay. Over time, these motions become so
refined that you will not even realize that you are making them.

Eventually you will replace step 1, with that of a throw from a partner.
Make sure your throwing partner is throwing you the same spin that you
practice with or everything will seem awry. If your partner can make a
hovering throw, again try to make contact with the disc at a point in its
flight where it is transitioning from flight to fall. Let your finger and
arm give with the disc as you receive it, acting as a shock absorber to
slow its momentum to a standstill.

The whole process is learning this eye-hand coordination. Players have
reported different lengths of time to learn the skill from less than a
week to maybe six weeks. A youthful age and athletic tendencies will tend
towards the shorter time. Practice every day for at least fifteen minutes
and you will see results of increasing delay times.

Once you’re comfortable in maintaining a delay, ask questions about the
next level you want to attain.

And most of all, have fun.

Doug Korns
#beginner